

How to get a JavaFX App on ZuluFX in 60 Seconds
Most Java developers probably know by now that Oracle has open sourced the Java JDK and hosted its source code on Github (aka Project Skara).
Oracle encourages companies to get paid support for their LTS (Long-term support) versions of the JDK, however for the mass majority of developers (like myself), who still want to enjoy free versions of the latest JDK and JavaFX, we can now get distributions from third-party vendors or build it ourselves (OpenJDK / OpenJFX).
In this article, I will show you how to use a popular distribution from Azul to build a JavaFX HelloWorld Application in 60 seconds!
Requirements
- Java 11 SDK or above. The following are some of the vendors that have binary distributions of the JDK:
- Oracle OpenJDK
- Amazon Corretto
- Azul ZuluFX - Java SDK bundled with JavaFX modules.
- BellSoft Liberica JDK
- AdoptOpenJDK
- JavaFX 11 or above:
- GluonHQ - JavaFX 11 - 15
- Azul’s ZuluFX - Java SDK bundled with JavaFX modules.
Before we start the stopwatch (60 seconds), let’s install the ZuluFX distribution. Below are instruction on how to install the ZuluFX distribution. If you’ve already installed Java/JavaFX 11 or greater (from elsewhere) you can skip to the Getting Started section.
Installing ZuluFX
Azul creates a free and user-friendly distribution of the JDK bundled with JavaFX. Azul provides a simple user interface shown in figure 1 that allows you to pick and choose an appropriate version of the JDK and JavaFX in one compressed file to be downloaded. To get paid commercial Java support check out Azul’s support subscriptions.
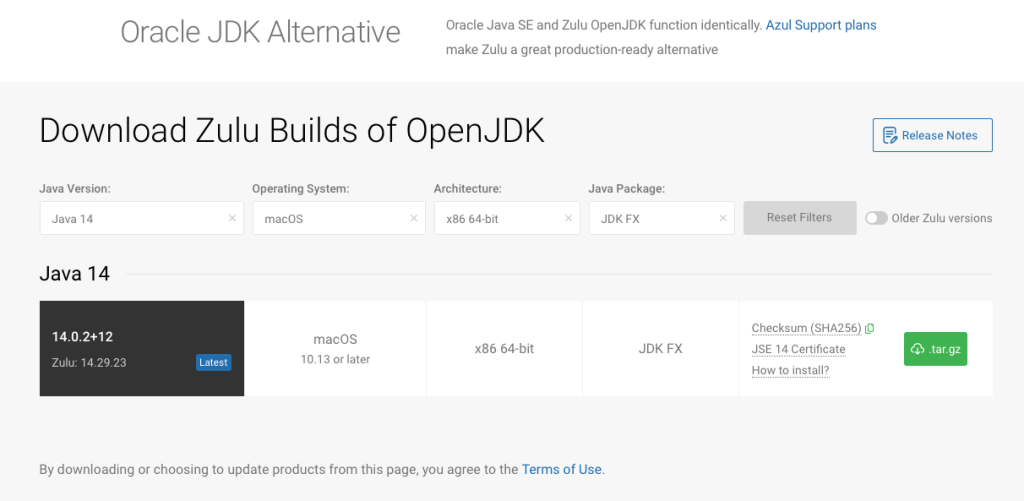
Download ZuluFX (JDK & JavaFX bundle) from:
https://www.azul.com/downloads/zulu-community
After downloading the bundle you should have a file named similar to the following:
zulu14.29.23-ca-fx-jdk14.0.2-macosx_x64.tar
These install instructions are on a MacOS, so I trust you will know how to translate the steps to your target platform (Windows and/or Linux).
# Make an sdks directory in your home directory
$ mkdir ~/sdks

# Move tar file into the sdks directory
$ mv ~/Downloads/zulu14.29.23-ca-fx-jdk14.0.2-macosx_x64.tar ~/sdks

# Change directory into <home directory>/sdks directory
$ cd ~/sdks

# Uncompress file
$ tar -xvf zulu14.29.23-ca-fx-jdk14.0.2-macosx_x64.tar

# Remove file (save some disk space)
$ rm zulu14.29.23-ca-fx-jdk14.0.2-macosx_x64.tar

# Set JAVA_HOME environment variable
$ export JAVA_HOME=~/sdks/zulu14.29.23-ca-fx-jdk14.0.2-macosx_x64

# Add JAVA_HOME/bin on the PATH environment variable
$ export PATH=$JAVA_HOME/bin:$PATH

# Verify installations of Java JDK
$ java -version
openjdk version "14.0.2" 2020-07-14
OpenJDK Runtime Environment Zulu14.29+23-CA (build 14.0.2+12)
OpenJDK 64-Bit Server VM Zulu14.29+23-CA (build 14.0.2+12, mixed mode, sharing)

# Verify JavaFX Modules are included in Zulu's Open JDK
$ java --list-modules
...
javafx.base@14.0.2
javafx.controls@14.0.2
javafx.fxml@14.0.2
javafx.graphics@14.0.2
javafx.media@14.0.2
javafx.swing@14.0.2
javafx.web@14.0.2
...
Getting Started
On your mark, get set, GO!
Step 1: Create the helloworld project directory structure

The following commands create the project and src directories.
# Windows
C:\Users\myusername>md helloworld
C:\Users\myusername>md helloworld\src

# Linux
/user/home/myusername$ mkdir -p helloworld/src

# Mac
/Users/myusername$ mkdir -p helloworld/src
*Note: After creating the project folder helloworld/src be sure to change your directory to reside inside the helloworld directory prior to the next steps. This is needed in order to compile and run the code such that the module path is recognized properly. This tutorial assumes your project (helloworld) is in the user’s home directory.
# Windows
C:\Users\myusername>cd helloworld

# Linux & MacOSX
$ cd ~/helloworld
Step 2: Create a module directory that will later contain the module-info.java file.
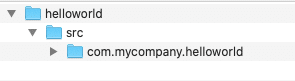 The module directory named using the reverse domain convention.
Create a directory using a preferred naming convention based on Java Module System’s new way to organize source code and modules (reverse domain name scheme).
mkdir src/com.mycompany.helloworld
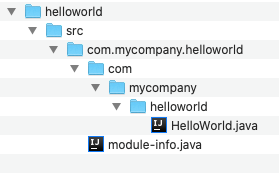
Step 3: Create the directory structure com/mycompany/helloworld that follows a package namespaces for HelloWorld.java
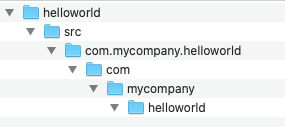 Figure 2. Project Directory structure for HelloWorld.java file.
Under the directory com.mycompany.helloworld you will create the following directory structure com/mycompany/helloworld. This directory will later contain the Helloworld.java file created in Step 5.
mkdir -p src/com.mycompany.helloworld/com/mycompany/helloworld
Step 4: Create a module-info.java file.
Create a file named module-info.java under the directory src/com.mycompany.helloworld as shown below.
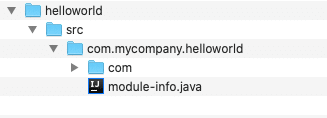 Figure 3. Module-info.java file
Copy and paste the code from Listing 1 into the module-info.java file. Use vi, nano or notepad. For example:
vim src/com.mycompany.helloworld/module-info.java
Listing 1. The module definition file module-info.java
module com.mycompany.helloworld {
   requires javafx.controls;
   exports com.mycompany.helloworld;
}
This lets the compiler know which core module dependencies the application needs to compile and run such as JavaFX modules.
The module-info.java defined above doesn’t need to include (requires ) the modules javafx.base and javafx.graphics , because the javafx.controls module already has them as transitive dependencies so, including them would be redundant. In this example a JavaFX button depends on the javafx.controls module.
The exports keyword exposes the com.mycompany.helloworld module to the runtime system.
Step 5: Create the JavaFX HelloWorld.java application file.
The file will be created in the directory src/com.mycompany.helloworld/com/mycompany/helloworld as shown in figure 4 below.
Use vim for those who despise those other wimpy editors 😉
vim src/com.mycompany.helloworld/com/mycompany/helloworld/HelloWorld.java
Copy and paste the code below (Listing 2) into the a file called HelloWorld.java.
Listing 2. JavaFX HelloWorld application code for HelloWorld.java
package com.mycompany.helloworld;

import javafx.application.Application;
import javafx.event.ActionEvent;
import javafx.event.EventHandler;
import javafx.scene.Group;
import javafx.scene.Scene;
import javafx.scene.control.Button;
import javafx.stage.Stage;

/**
 * A JavaFX Hello World
 */
public class HelloWorld extends Application {

   /**
    * @param args the command line arguments
    */
    public static void main(String[] args) {
       Application.launch(args);
    }

    @Override
    public void start(Stage stage) {
       stage.setTitle("Hello World");
       Group root = new Group();
       Scene scene = new Scene(root, 300, 250);
       Button btn = new Button();
       btn.setLayoutX(100);
       btn.setLayoutY(80);
       btn.setText("Hello World");
       btn.setOnAction( actionEvent ->
                 System.out.println("Hello World"));
       root.getChildren().add(btn);
       stage.setScene(scene);
       stage.show();
    }
}
***Step 6:***Compile your code!
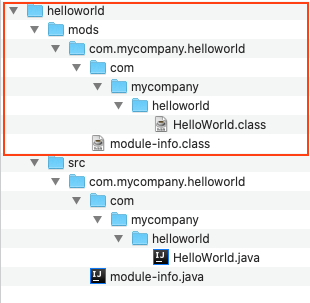
Compile the source code with the -d option with the location of compiled module. The directory for the new helloworld module is mods/com.mycompany.helloworld .
javac -d mods/com.mycompany.helloworld src/com.mycompany.helloworld/module-info.java src/com.mycompany.helloworld/com/mycompany/helloworld/HelloWorld.java
After compiling your code the class files the mods directory should look like the following:
***Step 7:***Execute the JavaFX HelloWorld application!
Execute the Hello World application as a module. After compiling the module into the mods directory you will now use Java 9 or above’s new --module-path option to specify a compiled module’s directory. Also, you will specify the***-m*** option to execute the module and its main class HelloWorld. Use the following command:
java --module-path mods -m com.mycompany.helloworld/com.mycompany.helloworld.HelloWorld
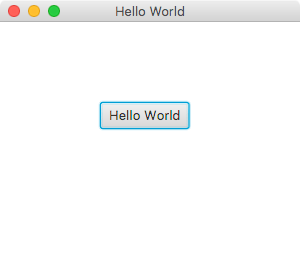
The following is the output of the previous command:
Conclusion
I’m not sure if you’ve taken more than 60 seconds to complete the steps, but assuming your environment is setup and the JDK 11+ and JavaFX is installed you should be able to cut and paste the code in seconds.
Hopefully you’ll find the new Java Platform Module System (JPMS) pretty straight forward. Although there is a little extra typing in order to let the compiler know where modules are, it’s really not that different than the -classpath option.
While we are living in strange times I still believe there are more exciting times in the Java world especially with more vendors and partners making Java JDK distributions more and more available.
Happy coding and stay safe!
References:
- OpenJFX.io - A community driven site to help developer get started with JavaFX https://openjfx.io
- Project Jigsaw: Module System Quick-Start Guide: http://openjdk.java.net/projects/jigsaw/quick-start
- JAVA PLATFORM, STANDARD EDITION ORACLE JDK 9 MIGRATION GUIDE: HTTPS://DOCS.ORACLE.COM/JAVASE/9/MIGRATE/TOC.HTM
- PROJECT JIGSAW: HTTP://BLOG.CODEFX.ORG/TAG/PROJECT-JIGSAW/
- The State of the Module System: http://openjdk.java.net/projects/jigsaw/spec/sotms/
- Java SE 9 - JPMS module naming: https://blog.joda.org/2017/04/java-se-9-jpms-module-naming.html
Found a mistake, or something to add? Edit this page on GitHub

Carl Dea
Carl Dea is a Lead Developer and Software Engineer at Deloitte. He has authored Java books and has been developing software for 20+ years with many clients, from Fortune 500 companies to nonprofit organizations. He has written software ranging from …

Discussions on the previous Foojay site
5 comments left on this article between 2020 and 2023, kept from the previous WordPress version of foojay.io. They are an archive and are closed for replies — use the discussion above to add to the conversation.
I followed this tutorial exactly, but got an error when I tried to compile the code:
src/com.mycompany.helloworld/module-info.java:2: error: module not found: javafx.controls
My Java version:
openjdk version “15.0.1” 2020-10-20
OpenJDK Runtime Environment Zulu15.28+13-CA (build 15.0.1+8)
OpenJDK 64-Bit Server VM Zulu15.28+13-CA (build 15.0.1+8, mixed mode, sharing)
(Updated comment)
Kiandra,
Would you mind zipping up your project and sending it to me?
carldea at gmail dot com
I’d be glad to look at what you have.
In the meantime let’s see.
Things to look for:
In module-info.java has requires javafx.controls module.
To compile make sure your environment variables are set properly. When using ZuluFX the module would be available.
When compiling make sure to have the following:
–add-modules javafx.controls
While somewhat a subtle difference, I believe the article is using JavaFX 14.0.2 instead of 15.0.1. I don’t believe it matters, but better to compare apples to apples👍🏻.
Assuming you’ve used Azul’s JDK w/JFX download chooser at: https://www.azul.com/downloads/zulu-community
In the article I don’t mention how to persist environment variables which can be added to your system depending on your os.
But in your current session (terminal/console) the article sets and exports the JAVA_HOME and PATH environment variables respectively.
$ java --list-modules
.
.
.
javafx.base@15.0.1
javafx.controls@15.0.1
javafx.fxml@15.0.1
javafx.graphics@15.0.1
javafx.media@15.0.1
javafx.swing@15.0.1
javafx.web@15.0.1
.
.
You should see the JavaFX related modules from the ZuluFX.
Thank you,
Carl
Kiandra,
I emailed you with additional notes. I recently from scratch downloaded the latest ZuluFX 15 release and went through the tutorial and it works for me.
I believe it’s possible the file/project structure is incorrect.
In a nutshell after creating the directory helloworld/src you’ll want to reside in the directory `helloworld` (cd helloworld) before compiling and running the example.
If this isn’t the issue, you may want to echo out your JAVA_HOME and PATH env variables.
We’ll get you up in running in no time. Thanks for sharing!
-Carl
Found the problem. I downloaded the Zulu JDK instead of the Zulu JDK FX package. Make sure you get the right one! Thank you Carl for all the help.
I was testing Zulufx and used your tutorial as a guide. Everything works fine. Thank you! I do have one question, though. I see you added `requires javafx.controls;` to your module-info file. I was thinking that since `JavaFX` is bundled with the JDK, this does not seem right. I have never had to use `requires` for anything else that is bundled in the JDK, so I took that out of the module-info file to see what would happen. The app ran without it. Does `requires javafx.controls;` have to be in the module-info file? If so, what are the drawbacks of not having it there since the program ran without it?